

Provider Connections
Before you get here, you should have MoneyHash dashboard access and a general sense of how Test and Live modes work. This page assumes you're ready to link a real (or sandbox) provider account. By the end, you'll understand what a connection is, how it's structured, how to set one up for the first time, and which integration type to choose. A connection is a configured link between your MoneyHash account and an external payment or financial service provider. It stores your provider credentials, defines which services you've enabled (Pay-In, Payout, etc.), and specifies the payment methods available under each service. When you create a payment intent, MoneyHash uses your active connections to determine which providers are eligible to process it, routing the transaction, handling provider communication, and returning a unified response, regardless of which provider is on the other end.
The Connection Model
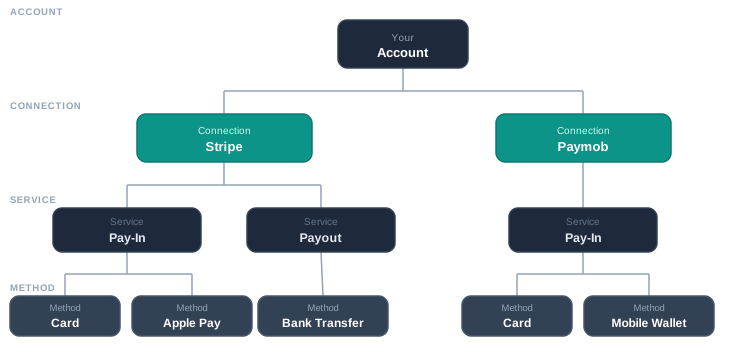
Connection → Service → Method
Every connection in MoneyHash follows a three-level structure:
- Connection - the provider itself (e.g., Stripe, Paymob, Checkout.com)
- Service - the type of transaction enabled on that connection (e.g., Pay-In, Payout)
- Method - the specific payment method within that service (e.g., Card, Apple Pay, Bank Transfer)
Connect Your First Provider
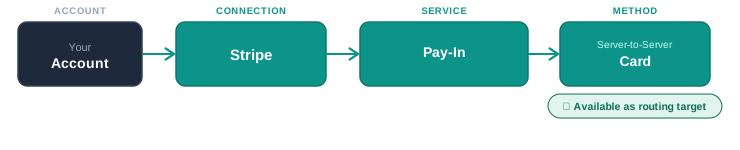
Stripe with Card payments: Create a Stripe connection, enable the Pay-In service, then enable the Card method on it. From that point, MoneyHash can route any eligible card transaction to Stripe - no additional code required.
Many connections also include a Provider Sandbox toggle that lets you test the full provider flow - real webhooks, 3DS, callbacks - without processing real payments. Not every provider works this way: some instead issue entirely separate sandbox vs. live credentials, and the environment is determined by which credential set you enter rather than by a toggle. See Connection Environments below for how each pattern works.
If it's there, turn it on and send a test transaction before going live. If it's not, the provider decides sandbox vs. live from the credentials you enter, there's nothing to toggle. See Connection Environments below.
To set this up yourself:
Go to Connections → Add Connection → search for your provider
In the MoneyHash dashboard, navigate to Connections and click Add Connection. Search for the provider you want to connect. For example, Stripe.
Enter your provider credentials
Paste in the credentials from your Stripe dashboard (API key, webhook secret). Each connection stores its own independent credential set, adding a second Stripe instance later will use a different set entirely.
Enable the Pay-In service → enable the Card method
Open the Pay-In service on the connection and enable it. Then enable the Card method and set the currencies you want to accept (e.g. USD, AED, EGP). The Card method is now active and available as a routing target in your payment flows.
Choose your integration type
Integration type is set at the method level, not the connection. If Stripe's Card method supports more than one type, pick Server-to-Server it's the only type that supports tokenization and provider fallback. See PayIn Integration Types below for a full comparison.
One Provider, Multiple Configurations
MoneyHash lets you create more than one instance of the same provider. Each instance is a fully independent connection, its own credentials, its own method settings, its own routing behavior.
This matters because payment infrastructure is rarely one-size-fits-all. A business operating across markets, products, or currencies needs the ability to configure each context separately and MoneyHash is designed for exactly that.
Common reasons teams run multiple instances of the same provider:
- Separate MIDs per market a Checkout.com instance for Egypt (EGP) and a separate one for UAE (AED), each connected to the right acquirer account
- Isolated business units each brand, product line, or sub-merchant with its own provider account and its own transaction trail
- Separate sandbox and production connections a connection with Provider Sandbox enabled (or sandbox credentials) mapped to your test environment, and a separate live connection mapped to production, so test and live traffic are never mixed
- Staged rollout a new provider configured and tested in parallel before replacing an existing one
Common Mistakes to Avoid
PayIn Integration Types
The integration type on a Pay-In connection determines how card data moves between your system, MoneyHash, and the provider. It's configured per method and directly controls whether card tokenization, provider fallback, and advanced checkout customization are available to you.
When evaluating a new provider, confirm S2S support before starting the integration. If you are currently on JS SDK or Iframe, migrating to S2S is the path to enabling tokenization, fallback, and advanced routing. For a full breakdown of integration types across all MoneyHash surfaces, see MoneyHash Integration Types.
Capability Comparison
| S2S | JS SDK | Iframe | Redirect | |
|---|---|---|---|---|
| Card Tokenization | ✅ | ❌ | ❌ | ❌ |
| Provider Fallback | ✅ | ❌ | ❌ | ❌ |
| Advanced Customization | ✅ | ❌ | ❌ | ❌ |
The Four Integration Types
Server-to-Server (S2S) Recommended
Card data is collected by the MoneyHash SDK on your frontend and processed through MoneyHash's routing layer to the provider. No provider JavaScript runs in the browser, the flow is entirely backend-to-backend between MoneyHash and the provider. This is the only integration type that supports tokenization, fallback, and the full SDK feature set.
JS SDK Provider integration
The provider's JavaScript library runs directly in the browser and collects card data. MoneyHash wraps it in an iframe and manages the transaction lifecycle, but the card data path is entirely within the provider's own client-side code. Card tokenization and provider fallback are not available.
Use this when the provider does not expose a backend card API, or when migrating to S2S is not immediately viable.
Iframe Provider integration
The provider hosts a payment form on their own infrastructure, embedded in your page. MoneyHash receives the transaction outcome via webhook. The card input UI is entirely controlled by the provider's hosted environment.
Use this when the provider only offers a hosted payment form with no direct API.
Redirect Provider integration
The buyer is redirected to the provider's hosted payment page to complete payment, then returned to a URL you configure. MoneyHash receives the result via webhook and updates the intent status.
Common with regional BNPL providers, open banking flows, and bank transfer methods.
Native Pay Integration Types
Apple Pay and Google Pay require more configuration than standard card connections. Beyond credentials, you decide who handles domain verification, who hosts the payment button, and whether to enable Self-Serve token decryption for routing and recovery. The model you choose determines all of this.
Three Integration Models
Provider Hosted
The payment service provider (PSP) manages domain verification, SDK hosting, and token decryption. The buyer clicks an Apple Pay button on your page, gets taken to an iframe on the provider's domain, and clicks Apple Pay again, two clicks total. Setup is minimal, but you're locked to a single provider with no recovery options if the PSP is unavailable.
Merchant Hosted
You host the Apple Pay button natively on your checkout page, complete domain verification directly with Apple, and pass the encrypted token to MoneyHash. The buyer sees one click, the button is native to your page with no redirect or frame.
With Self-Serve enabled, MoneyHash decrypts the token and sends a network token to the provider, enabling routing and recovery across multiple PSPs. Without Self-Serve, the encrypted token is locked to one PSP and cannot be rerouted.
MoneyHash Hosted
MoneyHash verifies a domain on your behalf and hosts the payment button inside a MoneyHash-managed page. The buyer still sees two clicks (one on your page, one inside the hosted frame), but you don't need to own or verify a domain.
With Self-Serve enabled, the same routing and recovery capabilities available in Merchant Hosted are available here.
Self-Serve: Routing & Recovery for Native Pay
Without Self-Serve, an encrypted Apple Pay token is tied to the PSP that generated it, if that PSP is unavailable, the payment fails and the buyer cannot re-authenticate. With Self-Serve, MoneyHash decrypts the token itself (using its PCI certification) and sends a network token to any compatible provider, enabling seamless failover and BIN-based routing. Self-Serve is available at no extra charge.
Self-Serve is a capability layer, not a separate model. It adds MoneyHash-side token decryption to either Merchant Hosted or MoneyHash Hosted. Provider Hosted does not support Self-Serve.
Comparison
| Provider Hosted | Merchant Hosted | MoneyHash Hosted | |
|---|---|---|---|
| Domain Verification | Provider | You | MoneyHash |
| SDK Hosting | Provider | You | MoneyHash |
| Token Decryption (standard) | Provider | Provider | Provider |
| Token Decryption (Self-Serve) | ❌ | MoneyHash | MoneyHash |
| UX (clicks to pay) | 2 | 1 | 2 |
| Routing & Recovery | ❌ | ✅ with Self-Serve | ✅ with Self-Serve |
How to Choose
- Best UX + routing capabilities → Merchant Hosted + Self-Serve
- Routing capabilities without managing your own domain → MoneyHash Hosted + Self-Serve
- Simplest setup, UX trade-offs acceptable → Provider Hosted
Self-serve Connection Setup
A self-serve connection lets you configure an Apple Pay or Google Pay connection entirely through the MoneyHash dashboard, without coordinating with the MoneyHash solutions team. You provide your own certificate or merchant ID, configure the underlying card method, and complete domain verification yourself.
Self-serve and MoneyHash-Assisted describe who performs the connection setup steps, certificate upload, domain verification, dashboard configuration, not which of the three integration models above you're using. With MoneyHash-Assisted setup, the MoneyHash solutions team configures the certificate and domain verification with you rather than you completing every step independently. Either setup path can be paired with any of Provider Hosted, Merchant Hosted, or MoneyHash Hosted.
| Self-serve | MoneyHash-Assisted | |
|---|---|---|
| Certificate management | You manage it | MoneyHash manages it |
| Setup timeline | Fully independent | Requires coordination with MoneyHash |
| Certificate reuse across connections | ✅ Reuse your cert | ✅ MoneyHash configures on your behalf |
| Best for | Teams with existing certs or DevOps ownership of setup | Teams onboarding for the first time |
Prerequisites
Before starting, confirm you have:
- Apple Pay: An Apple Developer account with a valid Merchant Identity Certificate, and your domain registered with Apple
- Google Pay: A registered Google Merchant ID from the Google Pay Business Console
- MoneyHash dashboard access with connection management permissions
- An active card provider connection, native pay methods process through a card connection
Your Apple Pay Merchant Identity Certificate can be reused across multiple MoneyHash connections. You do not need a separate certificate per connection if they share the same merchant identity.
Setup Steps
The complete setup walkthrough, credential upload, domain verification file hosting, and Self-Serve configuration, is available directly in the MoneyHash dashboard when you create a self-serve Apple Pay or Google Pay connection; the in-product guide walks through each field in order.
Common Errors & Troubleshooting
Connection Environments
MoneyHash has two modes Test and Live and understanding how they map to provider testing is the most common source of confusion during integration.
| Test Mode | Live Mode · Provider Sandbox | Live Mode · Provider Live | |
|---|---|---|---|
| Communicates with provider | ❌ | ✅ Yes provider's sandbox | ✅ Yes, provider's production |
| Provider credentials needed | No, any input accepted | Yes, provider test keys | Yes, live credentials |
| Real money movement | No | No | Yes |
| Best for | Building and testing your integration logic | End-to-end flow testing with the real provider | Production |
The key point: if you need to test the actual provider, their payment pages, webhooks, success/failure callbacks you must be in Live Mode with Provider Sandbox enabled. Test Mode never reaches a provider.
Not every provider exposes sandbox vs. live the same way some use a toggle like the one described above, others issue entirely separate credential sets per environment.
For the full breakdown of modes, how providers handle sandbox vs. live credentials, and how to structure staging vs. production accounts, see MoneyHash Modes (Test vs Live).
Updated about 2 months ago