

Integration Steps
MoneyHash SDKs are available across Web and Mobile platforms. The integration steps follow the same concepts across all platforms - install the SDK, initialize it with your public API key, create an intent on your backend, then use SDK methods to drive the payment flow. Platform-specific syntax is covered in the dedicated pages below.
Integration Steps assume you have completed your server-side integration and your account is configured in the MoneyHash dashboard. If you haven't done that yet, start with Integration Types Overview.
Installation
Install the SDK for your platform using the package manager of your choice.
| Platform | Package | Install from |
|---|---|---|
| Web | @moneyhash/js-sdk | npm |
| iOS | MoneyHash | Swift Package Manager (CocoaPods also available) |
| Android | io.moneyhash:android | Maven Central |
| Flutter | moneyhash_payment | pub.dev |
| React Native | @moneyhash/reactnative-sdk | npm |
Install the SDK for your platform:
npm install @moneyhash/js-sdkXcode → File → Add Package Dependencies…
https://github.com/MoneyHash/moneyhash-spm// build.gradle.kts
dependencies {
implementation("io.moneyhash:android:<LATEST_VERSION>")
}flutter pub add moneyhash_paymentnpm install @moneyhash/reactnative-sdkInitialization
After installation, initialize the SDK with your account's public API key. This must be done before calling any SDK methods.
The public API key is available in your MoneyHash dashboard under Settings → API Keys.
import MoneyHash from "@moneyhash/js-sdk/headless";

const moneyHash = new MoneyHash({
  type: "payment", // or "payout"
  publicApiKey: "<YOUR_PUBLIC_API_KEY>",
});
import MoneyHash
let moneyHash = MoneyHashSDKBuilder()
.setPublicKey("<YOUR_PUBLIC_API_KEY>")
.build()import com.moneyhash.sdk.android.core.MoneyHashSDKBuilder
val moneyHash = MoneyHashSDKBuilder
.setPublicKey("<YOUR_PUBLIC_API_KEY>")
.build()import 'package:moneyhash_payment/moneyhash_payment.dart';
final moneyHash = MoneyHashSDKBuilder().build();
moneyHash.setPublicKey("<YOUR_PUBLIC_API_KEY>");import { MoneyHashSDKBuilder } from "@moneyhash/reactnative-sdk";
const moneyHash = MoneyHashSDKBuilder.build();
moneyHash.setPublicKey("<YOUR_PUBLIC_API_KEY>");The public API key is safe to use on the client side. Never use your secret API key in the SDK - it is for server-side use only.
How the SDK flow works
The SDK is state-driven. Every call to an SDK method returns an intent state and a stateDetails object. Your code reads the state and renders the appropriate UI or calls the next SDK method. The flow advances state by state until the intent reaches a terminal state.
The intent is always created on your backend first - the SDK then takes the intentId and drives the customer-facing experience from there.
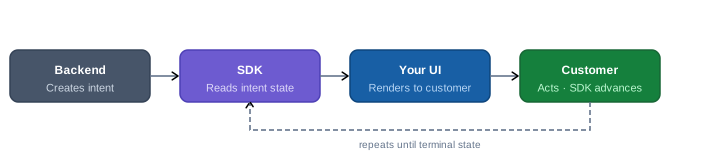
For the full state reference including all possible states, what each means, and how to handle them - see SDK Architecture.
Platform pages
Each sub-page below covers a specific capability with platform-specific code across Web, iOS, Android, Flutter, and React Native.
| Page | What it covers | Platforms |
|---|---|---|
| SDK Architecture | Basic Concepts, Get Available Methods, Collect Card Information, Pay Using Card Information, Save Card for Future Use | All |
| Build Card Form | Build a fully custom card form | All |
| Apple Pay | Integrate Apple Pay natively | Web, iOS, Flutter, React Native |
| Google Pay | Integrate Google Pay natively | Web, Android, Flutter, React Native |
| Bank Account | Add bank account as a payment method | All |
| Installment Plans | Display and select installment options | All |
| Subscription Plans | Set up subscription-based payments | All |
| BIN Lookup | Look up card details by BIN before payment | Web |
Updated 2 months ago