

Bank Account
Bank account payments let customers pay directly from their bank account. MoneyHash supports two scenarios - tokenizing a bank account for future use, and paying with a saved bank account token - usable as separate flows or combined in one journey. This page covers both on every platform: Web (JavaScript), iOS, Android, Flutter, and React Native.
How it works
The model is authorize once, pay many times. The customer connects their bank account through their bank's authorization page exactly once - that creates a reusable bank account token stored against the customer. From then on, every payment reuses the token; the customer still confirms each charge at their bank, but never re-links the account.
Once the token exists, there are three ways to charge it: pre-select it at intent creation (bankaccount_token - the flow skips method selection and goes straight to the bank), suggest it (paying_bankaccount_token - all methods are shown with the saved account pre-picked), or drive it entirely through the SDK (getMethods → savedBankAccounts → proceedWith).
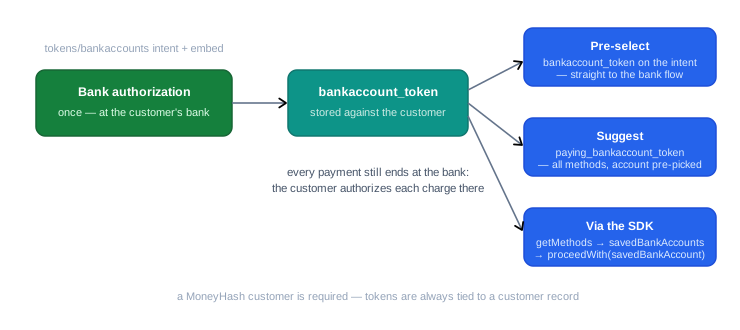
Both scenarios require a MoneyHash customer to exist first - bank account tokens are always associated with a customer record.
Tokenize a bank account
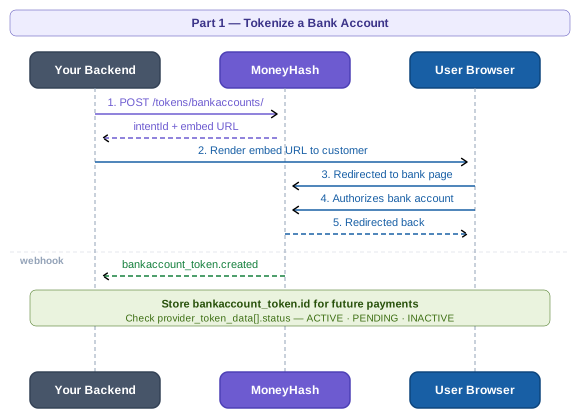
The full tokenization round-trip, in sequence:
Step 1 - Create a bank account token intent
Create a bank account token intent from your backend. This is a separate endpoint from the payment intent - it is specifically for authorizing and saving a bank account.
Required parameters:
| Parameter | Description |
|---|---|
customer | The MoneyHash customer UUID to associate the bank account token with |
webhook_url | Your backend endpoint that receives token creation notifications |
Optional parameters:
| Parameter | Description |
|---|---|
successful_redirect_url | Where to redirect the customer after successful bank authorization |
failed_redirect_url | Where to redirect after failed authorization |
pending_approval_redirect_url | Where to redirect when the bank account is pending approval |
curl --request POST \
  --url https://web.moneyhash.io/api/v1.4/tokens/bankaccounts/ \
  --header 'Authorization: Token <your_api_key>' \
  --header 'Content-Type: application/json' \
  --data '{
    "customer": "<CUSTOMER_ID>",
    "webhook_url": "https://yourbackend.com/webhooks/moneyhash",
    "successful_redirect_url": "https://yourapp.com/bank-account/success",
    "failed_redirect_url": "https://yourapp.com/bank-account/failed",
    "pending_approval_redirect_url": "https://yourapp.com/bank-account/pending"
}'Retain the intentId from the response - you pass it to the SDK in the next step to render the bank account authorization flow.
Step 2 - Render the bank account authorization embed
Pass the intentId to the SDK to render the authorization flow. The customer is taken to their bank to authorize the account, then returned to your application. On mobile, the call resolves with a BankAccountTokenizationStatus - SUCCESSFUL, PENDING_APPROVAL, or FAILED - so you can react in-app without waiting for the webhook.
await moneyHash.renderCreateBankAccountTokenEmbed({
  intentId: "<intent_id>",
  selector: "#bank-account-container",
});
moneyHash.renderCreateBankAccountTokenEmbed(
on: self, // the presenting UIViewController
intentId: "<intent_id>"
) { result in
switch result {
case .success(let status):
// .successful · .pendingApproval · .failed
self.handleBankAccountStatus(status)
case .failure(let error):
self.showError(error)
}
}// In your Composable — the result arrives through the contract:
val bankAccountLauncher = rememberLauncherForActivityResult(
BankAccountResultContract()
) { status: BankAccountStatus? ->
// SUCCESSFUL · PENDING_APPROVAL · FAILED (null = dismissed)
viewModel.handleBankAccountStatus(status)
}
moneyHash.renderCreateBankAccountTokenEmbed(
intentId = "<intent_id>",
launcher = bankAccountLauncher
)final status = await moneyHash.renderCreateBankAccountTokenEmbed(
"<intent_id>",
);
// BankAccountTokenizationStatus.successful · .pendingApproval · .failedconst status = await moneyHash.renderCreateBankAccountTokenEmbed({
intentId: "<intent_id>",
});
// BankAccountTokenizationStatus.SUCCESSFUL · PENDING_APPROVAL · FAILEDStep 3 - Handle the token creation webhook
When the bank account is successfully authorized, a bankaccount_token.created webhook is delivered to your webhook_url.
{
  "type": "bankaccount_token.created",
  "data": {
    "intent_id": "<INTENT_ID>",
    "bankaccount_token": {
      "id": "<BANK_ACCOUNT_TOKEN_ID>",
      "bank_identifier": "LEANMB1_SAU",
      "provider_token_data": [
        { "status": "ACTIVE" }
      ],
      "custom_fields": null
    }
  }
}
Store data.bankaccount_token.id against the customer record - this is the token used for future payments. Check provider_token_data[].status:
| Status | Meaning |
|---|---|
ACTIVE | Token is ready for use in payments |
PENDING | Bank account is pending approval - cannot be used for payments yet |
INACTIVE | Token has been created but requires customer action to activate - behavior may vary by bank |
Pay with a saved bank account token
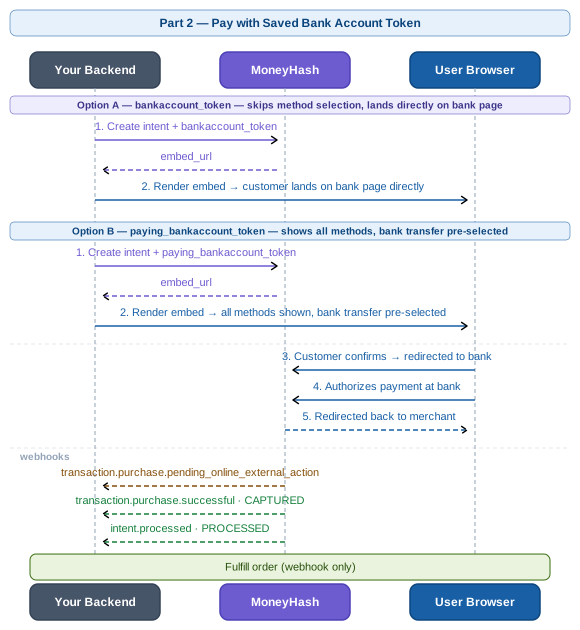
Once a bank account token exists for a customer, you have two options for how to use it at intent creation — or you can drive the whole thing from the SDK (next section). The payment round-trip:
Option A - Pre-select the bank account (bankaccount_token)
bankaccount_token)Pass bankaccount_token at intent creation. The payment flow skips method selection entirely and goes directly to the bank's page for account selection and authorization.
curl --request POST \
  --url https://web.moneyhash.io/api/v1.4/payments/intent/ \
  --header 'Authorization: Token <your_api_key>' \
  --header 'Content-Type: application/json' \
  --data '{
    "amount": 50,
    "amount_currency": "AED",
    "operation": "purchase",
    "webhook_url": "https://yourbackend.com/webhooks/moneyhash",
    "customer": "<CUSTOMER_ID>",
    "bankaccount_token": "<BANK_ACCOUNT_TOKEN_ID>"
}'Use bankaccount_token when you want to take the customer directly into the bank transfer flow without showing other payment options.
Option B - Suggest the bank account (paying_bankaccount_token)
paying_bankaccount_token)Pass paying_bankaccount_token at intent creation. All available payment methods are shown, but bank transfer is highlighted with the saved account pre-selected. The customer confirms before proceeding to the bank's authorization page.
curl --request POST \
  --url https://web.moneyhash.io/api/v1.4/payments/intent/ \
  --header 'Authorization: Token <your_api_key>' \
  --header 'Content-Type: application/json' \
  --data '{
    "amount": 50,
    "amount_currency": "AED",
    "operation": "purchase",
    "webhook_url": "https://yourbackend.com/webhooks/moneyhash",
    "customer": "<CUSTOMER_ID>",
    "paying_bankaccount_token": "<BANK_ACCOUNT_TOKEN_ID>"
}'Use paying_bankaccount_token when you want to show all available payment options while surfacing the customer's saved bank account as a convenient pre-selected choice.
Using saved bank accounts via the SDK
You can also retrieve and pay with saved bank accounts programmatically - without pre-selecting anything at intent creation.
Step 1 - Get the saved bank accounts
Pass the customer so their saved accounts come back with the methods. Each saved account carries an id, bankIdentifier, status, the account list, and a bank logo for your UI.
const { savedBankAccounts } = await moneyHash.getMethods({
  currency: "<currency>",
  amount: "<amount>",
  customer: "<customer_id>",
});

// savedBankAccounts: BankAccount[]
// { id, bankIdentifier, status, accounts: [{ accountName }], logo }
let methods = try await moneyHash.getMethods(
currency: "<currency>",
amount: <amount>,
customer: "<customer_id>",
flowId: nil, operation: nil, customFields: nil
)
let savedBankAccounts = methods.savedBankAccounts
// id · bankIdentifier · status · accounts · logoval methods = moneyHash.getMethods(
currency = "<currency>",
amount = <amount>,
customerId = "<customer_id>",
customFields = null
)
val savedBankAccounts = methods.savedBankAccounts
// id · bankIdentifier · status · accounts · logofinal methods = await moneyHash.getMethods(
GetMethodsParams.withCurrency(
currency: "<currency>",
amount: <amount>,
customer: "<customer_id>",
),
);
final savedBankAccounts = methods.savedBankAccounts;
// id · bankIdentifier · status · accounts · logoconst methods = await moneyHash.getMethods({
currency: "<currency>",
amount: <amount>,
customer: "<customer_id>",
});
const savedBankAccounts = methods.savedBankAccounts;
// id · bankIdentifier · status · accounts · logoStep 2 - Proceed with the selected bank account
const intentDetails = await moneyHash.proceedWith({
  type: "savedBankAccount",
  id: "<bank_account_id>",
  intentId: "<intent_id>",
});
let result = try await moneyHash.proceedWithMethod(
intentId: "<intent_id>",
intentType: .payment,
selectedMethodId: "<bank_account_id>",
methodType: .savedBankAccount,
metaData: nil,
useWalletBalance: nil,
installmentPlanData: nil
)val result = moneyHash.proceedWithMethod(
intentId = "<intent_id>",
intentType = IntentType.Payment,
selectedMethodId = "<bank_account_id>",
methodType = MethodType.SAVED_BANK_ACCOUNT,
methodMetaData = null
)final result = await moneyHash.proceedWithMethod(
"<intent_id>",
IntentType.payment,
"<bank_account_id>",
MethodType.savedBankAccount,
null, // methodMetaData
null, // useWalletBalance
);const result = await moneyHash.proceedWithMethod(
"<intent_id>",
IntentType.Payment,
"<bank_account_id>",
MethodType.SavedBankAccount
);Step 3 - Handle URL rendering
After proceeding, the intent typically lands on the URL to render state - the customer must authorize the payment at their bank. Hand the state to renderUrl and the SDK runs the bank flow and resolves with the outcome.
const intentDetails = await moneyHash.renderUrl({
  intentId: "<intent_id>",
  url: stateDetails.url,
  renderStrategy: stateDetails.renderStrategy,
});
// Render the bank authorization URL from the UrlToRender state —
// the SDK opens it in an in-app webview and returns the result.
moneyHash.renderURL(
on: self,
urlToRender: URL(string: stateDetails.url)!,
intentId: "<intent_id>",
embedStyle: nil,
intentType: .payment
) { result in /* final IntentDetails */ }moneyHash.renderUrl(
url = stateDetails.url,
intentId = "<intent_id>",
intentType = IntentType.Payment,
launcher = intentLauncher // ActivityResultLauncher<IntentCreationParams>
)final intentDetails = await moneyHash.renderURL(
stateDetails.url,
"<intent_id>",
IntentType.payment,
null, // embedStyle
);const intentDetails = await moneyHash.renderURL({
url: stateDetails.url,
intentId: "<intent_id>",
intentType: IntentType.Payment,
});Webhooks
Both payment scenarios fire the same webhook sequence. The operation progresses through pending → pending_online_external_action (the customer is at the bank authorizing) → successful.
Webhook 1 - Pending online external action
type: transaction.purchase.pending_online_external_action
payment_status.status: AUTHORIZE_ATTEMPT_PENDING
The customer is completing authorization at their bank. Don't act on this - wait for the successful webhook.
Webhook 2 - Transaction successful
type: transaction.purchase.successful
payment_status.status: CAPTURED
Payment confirmed. Act on this to fulfill the order.
Webhook 3 - Intent processed
type: intent.processed
intent.status: PROCESSED
payment_status.status: CAPTURED
Terminal state. No further transactions will be created.
Platform notes and handling
- Android manifest - required for every Android app (native Android, Flutter, and React Native alike): the SDK does not declare
BankAccountActivityin its own manifest, so manifest merging won't add it for you. The tokenization embed launches this activity - without the declaration the flow crashes on start. Add it toandroid/app/src/main/AndroidManifest.xml:
<activity
  android:name="com.moneyhash.sdk.android.bank.BankAccountActivity"
android:theme="@style/Theme.AppCompat.Light.NoActionBar.FullScreen"/>- React on the in-app status, confirm on the webhook. The mobile embed resolves with
SUCCESSFUL/PENDING_APPROVAL/FAILEDfor immediate UI feedback, but thebankaccount_token.createdwebhook (and the token status inside it) is what your backend should trust before enabling payments with the token. PENDING_APPROVALis not a failure. Some banks approve asynchronously - show a "pending" state and let the webhook flip it to active.- Filter by status before showing saved accounts. Only offer accounts whose token status allows payment; a
PENDINGorINACTIVEtoken will not complete a charge. - The bank authorization is per-payment. Tokenization removes re-linking, not the bank's own confirmation - design the UI to expect the redirect/webview hop on every charge.
Updated 2 months ago