

Google Pay
Google Pay™ lets customers pay with the cards saved in their Google account - a fast, native checkout experience. The MoneyHash SDK provides the configuration needed to initialize the Google Pay button: you render the button, Google handles the authorization sheet, and the encrypted token is submitted to MoneyHash to complete the payment. This page covers the full integration on every platform - Web (JavaScript), Android, Flutter, and React Native.
How it works
Whatever the platform, Google Pay is the same three moves: get the Google Pay configuration from MoneyHash, get an encrypted token from Google, and submit that token back to MoneyHash. The difference is how much the SDK does for you:
- Web - you render Google's button element and configure its payment request from
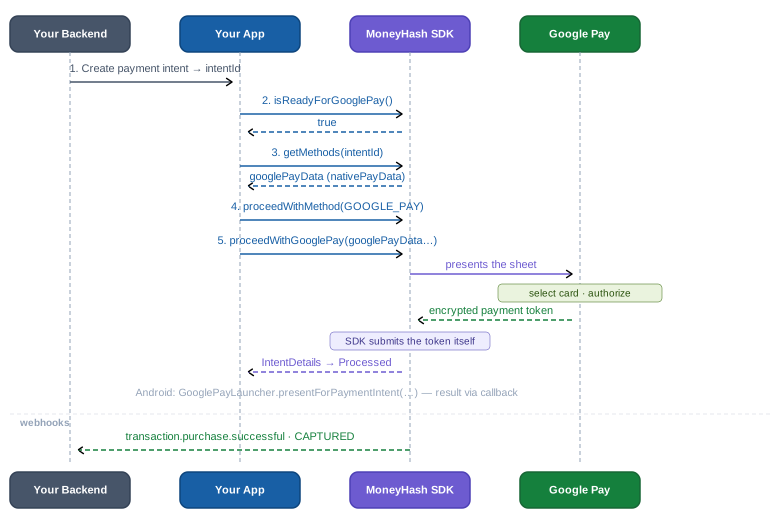
nativePayData; when the customer authorizes, you submit the token withproceedWith+submitPaymentReceipt. - Android · Flutter · React Native - after selecting Google Pay on the intent, one call presents the sheet and submits the token for you (
proceedWithGooglePayon Flutter/React Native, theGooglePayLauncheron Android) and resolves with the final intent details.
Four parties touch a Google Pay payment, and each holds exactly one piece. Your app owns the button and the checkout UI - nothing sensitive. Google Pay authenticates the customer and answers with an encrypted payment token; the tokenization spec (gateway + gatewayMerchantId) determines who can decrypt that token - the gatewayMerchantId is the merchant identifier at the gateway used in the encryption (your merchant id at the underlying provider such as Checkout, or your MoneyHash merchant id, depending on the connection) - so the real card number is never exposed to your code. MoneyHash supplies the configuration the button needs (nativePayData, straight from your Google Pay connection) and is the only party that can turn the token into money - it decrypts it server-side and routes the charge to your provider.
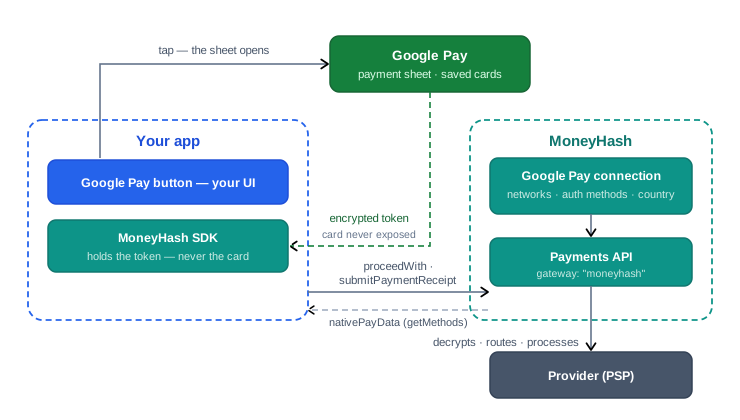
Step by step, a payment looks like this:
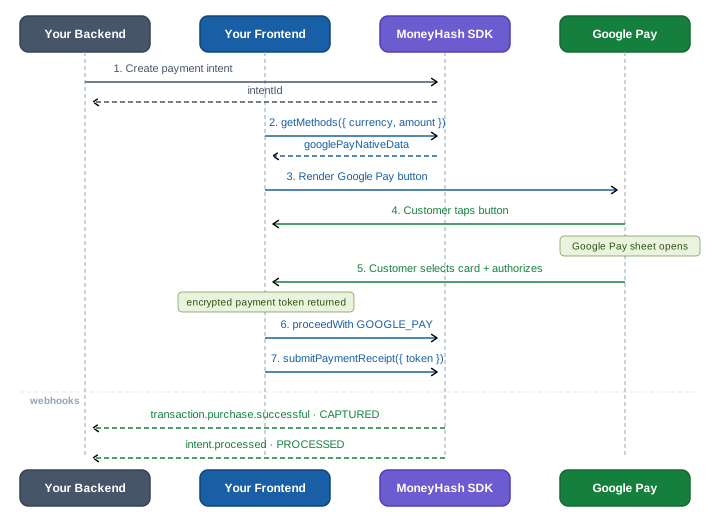
- Your backend creates a payment intent
- The SDK retrieves the Google Pay configuration via
getMethods - You render the Google Pay button using the returned
nativePayData - The customer selects a card in the Google Pay sheet and authorizes
- Google returns an encrypted payment token
- The token is submitted to MoneyHash - explicitly on the web (
proceedWith+submitPaymentReceipt), automatically on mobile - MoneyHash processes the payment and delivers webhooks
In sequence form - on the web, you drive the button and submit the token yourself:
On Android, Flutter, and React Native, the SDK presents the sheet and submits the token in one call:
Prerequisites
- A Google Pay connection configured and completed in your MoneyHash dashboard - enabling Google Pay is a property of the connection, not of your MoneyHash account. The allowed networks, auth methods, and country the SDK returns in
nativePayDataall come from this connection. - The gateway merchant identifier - used as
gatewayMerchantIdin the Google Pay tokenization spec. This is the merchant id at the gateway that decrypts the token (e.g. your merchant id at the underlying provider such as Checkout, or your MoneyHash merchant id, depending on the connection). It is returned automatically innativePayData- never hardcode it. - A registered Google Pay merchant ID
- Web only: HTTPS enabled on your domain, and your domain registered in the Google Pay Console for production use
Dashboard configuration
Before integrating, configure Google Pay in the MoneyHash dashboard:
| Setting | What it does |
|---|---|
| Allowed card networks | The supported schemes - Visa, Mastercard, Amex, Discover, JCB, Mada, etc. |
| Allowed auth methods | PAN_ONLY for standard cards, CRYPTOGRAM_3DS for 3DS-enabled cards |
| Google Pay country | The country where payments are processed |
| Underlying pay-in method | Links Google Pay to the correct provider |
Everything configured here is returned automatically in nativePayData from the SDK - no hardcoding required.
Integration steps
The same five steps on every platform - pick your platform's tab in each step.
Step 1 - Set up Google Pay in your app
On the web, load Google's Pay JS and (optionally) the button web component. On mobile, set the Google Pay configuration when building the SDK - most importantly the environment: TEST during development, PRODUCTION before going live.
<script src="https://pay.google.com/gp/p/js/pay.js"></script>
<!-- or, as a component: npm install @google-pay/button-element -->
val moneyHash = MoneyHashSDKBuilder
.setPublicKey("<YOUR_PUBLIC_API_KEY>")
.apply {
setNativeGooglePayConfig(NativeGooglePayConfig(
environment = GooglePayEnvironment.TEST, // PRODUCTION before going live
))
}
.build()final moneyHash = MoneyHashSDKBuilder()
.setNativeGooglePayConfig(NativeGooglePayConfig(
environment: GooglePayEnvironment.test, // production before going live
collectibleBillingData: [],
))
.build();const moneyHash = MoneyHashSDKBuilder.setNativeGooglePayConfig({
environment: GooglePayEnvironment.TEST, // PRODUCTION before going live
collectibleBillingData: [],
}).build();Step 2 - Check readiness
Only show the Google Pay button when the device can pay. On the web the button element handles this itself - it only renders when Google Pay is available. On mobile, ask the SDK - and remember every Google Pay API on Flutter / React Native is Android-only and throws on iOS.
// The <google-pay-button> element checks isReadyToPay for you and
// only renders when Google Pay is available on this device/browser.
// In your Composable — create and bind the launcher once:
val googlePayLauncher = rememberGooglePayLauncher(object : GooglePayResultCallback {
override fun onResult(result: IntentDetails) { viewModel.onGooglePayResult(result) }
override fun onError(throwable: Throwable) { viewModel.onGooglePayFailed(throwable) }
override fun onCancel() { viewModel.onGooglePayCancelled() } // sheet dismissed
})
BindEffect(googlePayLauncher)
// Then, before showing the button:
val isReady = googlePayLauncher.isReady(
allowedCardNetworks = googlePayData.allowedCardNetworks,
allowedCardAuthMethods = googlePayData.allowedCardAuthMethods,
)if (!Platform.isAndroid) return; // Google Pay APIs throw off-Android
final isReady = await moneyHash.isReadyForGooglePay();
if (!isReady) return; // hide the buttonif (Platform.OS !== "android") return; // Google Pay APIs reject off-Android
const isReady = await moneyHash.isReadyForGooglePay();
if (!isReady) return; // hide the buttonStep 3 - Get the Google Pay configuration
Retrieve the Google Pay configuration from the SDK. It is returned as nativePayData inside the matching express method - take every value from here, don't hardcode.
const { expressMethods } = await moneyHash.getMethods({
  currency: "<currency>",
  amount: "<amount>",
});

const googlePayMethod = expressMethods.find((method) => method.id === "GOOGLE_PAY");
const googlePayNativeData = googlePayMethod?.nativePayData;
val methods = moneyHash.getMethods(
intentId = "<YOUR_INTENT_ID>",
intentType = IntentType.Payment
)
val googlePayMethod = methods.expressMethods?.firstOrNull { it.id == "GOOGLE_PAY" }
val googlePayData = googlePayMethod?.nativePayData as? NativePayData.GooglePay
?: return // Google Pay not available on this flowfinal methods = await moneyHash.getMethods(
GetMethodsParams.withIntent("<YOUR_INTENT_ID>", IntentType.payment),
);
final googlePayMethod =
methods.expressMethods?.firstWhere((m) => m.id == "GOOGLE_PAY");
final googlePayData = googlePayMethod?.nativePayData as GooglePayData?;
if (googlePayData == null) return; // Google Pay not available on this flowconst methods = await moneyHash.getMethods("<YOUR_INTENT_ID>", IntentType.Payment);
const googlePayMethod = methods.expressMethods?.find((m) => m.id === "GOOGLE_PAY");
const googlePayData = googlePayMethod?.nativePayData;
if (!googlePayData) return; // Google Pay not available on this flownativePayData reference (snake_case on the web, camelCase GooglePayData on mobile):
| Web field | Mobile field | Description |
|---|---|---|
gateway | gateway | Always "moneyhash" - the gateway identifier for Google Pay tokenization |
gateway_merchant_id | gatewayMerchantId | The merchant identifier at the gateway, used in the token encryption - your merchant id at the underlying provider (e.g. Checkout) or your MoneyHash merchant id, depending on the connection |
merchant_id | merchantId | Your Google Pay merchant ID |
merchant_name | merchantName | Your business name |
amount | amount | Payment amount |
currency_code | currencyCode | ISO 4217 currency code |
country_code | countryCode | Country code where the payment is processed |
allowed_card_networks | allowedCardNetworks | Supported card networks - e.g. ["VISA", "MASTERCARD"] |
allowed_card_auth_methods | allowedCardAuthMethods | Auth methods - ["PAN_ONLY", "CRYPTOGRAM_3DS"] |
method_id | - | MoneyHash method identifier (web only) |
Step 4 - Select Google Pay and configure the button
On the web, use nativePayData to build the button's payment request. On mobile, attach Google Pay to the intent with proceedWithMethod - the sheet comes in the next step.
import "@google-pay/button-element";

const button = document.querySelector("google-pay-button");

button.paymentRequest = {
  apiVersion: 2,
  apiVersionMinor: 0,
  allowedPaymentMethods: [{
    type: "CARD",
    parameters: {
      allowedAuthMethods: googlePayNativeData.allowed_card_auth_methods,
      allowedCardNetworks: googlePayNativeData.allowed_card_networks,
      billingAddressRequired: true,
    },
    tokenizationSpecification: {
      type: "PAYMENT_GATEWAY",
      parameters: {
        gateway: googlePayNativeData.gateway,
        gatewayMerchantId: googlePayNativeData.gateway_merchant_id,
      },
    },
  }],
  merchantInfo: {
    merchantId: googlePayNativeData.merchant_id,
    merchantName: googlePayNativeData.merchant_name,
  },
  transactionInfo: {
    totalPriceStatus: "FINAL",
    totalPriceLabel: "Total",
    totalPrice: `${googlePayNativeData.amount}`,
    currencyCode: googlePayNativeData.currency_code,
    countryCode: googlePayNativeData.country_code,
  },
  emailRequired: true,
};
moneyHash.proceedWithMethod(
intentId = "<YOUR_INTENT_ID>",
intentType = IntentType.Payment,
selectedMethodId = "GOOGLE_PAY",
methodType = MethodType.EXPRESS_METHOD,
methodMetaData = null
)await moneyHash.proceedWithMethod(
"<YOUR_INTENT_ID>",
IntentType.payment,
"GOOGLE_PAY",
MethodType.expressMethod,
null, // methodMetaData
null, // useWalletBalance
);await moneyHash.proceedWithMethod(
"<YOUR_INTENT_ID>",
IntentType.Payment,
"GOOGLE_PAY",
MethodType.ExpressMethod
);Web: use environment="TEST" on the button during development and switch to environment="PRODUCTION" before going live. Your domain must be registered in the Google Pay Console for production use.
Step 5 - Complete the payment
On the web, handle the payment data event and submit the encrypted token yourself. On mobile, one call presents the sheet, collects the token, and submits it - you get the final intent details back.
button.addEventListener("loadpaymentdata", async (event) => {
  const { paymentMethodData, email } = event.detail;

  const googlePayReceipt = {
    receipt: paymentMethodData.tokenizationData.token,
    receiptBillingData: { email },
  };

  try {
    await moneyHash.proceedWith({
      type: "method",
      id: "GOOGLE_PAY",
      intentId,
    });

    const intentDetails = await moneyHash.submitPaymentReceipt({
      intentId,
      nativeReceiptData: googlePayReceipt,
    });

    // Handle success
  } catch (error) {
    // Handle error
  }
});

button.addEventListener("cancel", () => {
  // Customer closed the Google Pay sheet
});
// Presents the sheet, submits the token, and reports through the
// GooglePayResultCallback you registered in Step 2:
googlePayLauncher.presentForPaymentIntent(
"<YOUR_INTENT_ID>",
googlePayData.currencyCode.orEmpty(),
googlePayData.countryCode.orEmpty(),
googlePayData.amount ?: 0.0,
googlePayData.gateway.orEmpty(),
googlePayData.gatewayMerchantID.orEmpty(),
googlePayData.merchantId.orEmpty(),
googlePayData.merchantName.orEmpty(),
googlePayData.allowedCardNetworks,
googlePayData.allowedCardAuthMethods
)
// in the callback: onResult(result: IntentDetails) → render the state// Presents the sheet, submits the token, and resolves with the result:
final intentDetails = await moneyHash.proceedWithGooglePay(
"<YOUR_INTENT_ID>",
googlePayData.currencyCode!,
googlePayData.amount!,
googlePayData.countryCode!,
googlePayData.gateway!,
googlePayData.gatewayMerchantId!,
googlePayData.merchantId!,
googlePayData.merchantName!,
googlePayData.allowedCardNetworks,
googlePayData.allowedCardAuthMethods,
);// Presents the sheet, submits the token, and resolves with the result:
const intentDetails = await moneyHash.proceedWithGooglePay({
intentId: "<YOUR_INTENT_ID>",
currency: googlePayData.currencyCode!,
amount: googlePayData.amount!,
countryCode: googlePayData.countryCode!,
gateway: googlePayData.gateway!,
gatewayMerchantId: googlePayData.gatewayMerchantId!,
merchantId: googlePayData.merchantId!,
merchantName: googlePayData.merchantName!,
allowedCardNetworks: googlePayData.allowedCardNetworks,
allowedCardAuthMethods: googlePayData.allowedCardAuthMethods,
});Web: always call proceedWith before submitPaymentReceipt - submitting the token without first selecting Google Pay on the intent will cause the payment to fail. Mobile: call proceedWithMethod (Step 4) before presenting the sheet; the SDK submits the token for you.
Need the raw token on mobile? Every platform also exposes the two-step variant: generateGooglePayReceipt(...) presents the sheet and returns the receipt (on Android it's on the launcher, delivered through the callback's onResult(result: NativePayReceipt) overload), which you then pass to submitPaymentReceipt(intentId, receipt) yourself. Use it when you want to act between authorization and submission; otherwise prefer the one-call flow above.
Testing
Use environment="TEST" (GooglePayEnvironment.TEST on mobile) and Google's test card numbers during development:
| Network | Test card number |
|---|---|
| Visa | 4111111111111111 |
| Mastercard | 5555555555554444 |
| American Express | 378282246310005 |
You can also use the MoneyHash interactive sandbox to test Google Pay end-to-end without a live provider connection.
Handling
- Order matters once. The token can only be submitted after Google Pay is selected on the intent - explicit on the web, enforced by doing
proceedWithMethodbefore presenting the sheet on mobile. - Tokens are single-use. Each sheet authorization produces one token for one attempt - re-run the flow for a retry.
- Cancellation is not failure. Web: handle the button's
cancelevent. Mobile: the one-call flow reports a cancelled result - return the customer to the method list. - Take everything from
nativePayData. Networks, auth methods, country, amounts, and both merchant ids come from your dashboard connection viagetMethods- hardcoding them invites mismatches the sheet will reject. - Gate by platform. The button element self-gates on web;
isReadyForGooglePay()/launcher.isReady()on mobile - and on Flutter / React Native every Google Pay API is Android-only. - Environment mismatch is the #1 test failure. A
TESTbutton against a production-configured connection (or vice versa) fails opaquely - flip both together. - Card intelligence before submitting (web):
binLookupByReceiptaccepts Google Pay receipts too - run it between authorization andsubmitPaymentReceiptto branch on the card's brand, type, or issuer. The Android SDK has no receipt lookup - see SDK Architecture. - Webhooks are the source of truth. The SDK response tells the customer what happened; your backend should confirm on
transaction.purchase.successful.
Updated about 2 months ago